I love a quick but satisfying and effective DIY project and a giant yarn blanket is one of the easiest and simplest things anyone can make. If you want to give it a go, either for yourself or maybe as a handmade Christmas gift, I would highly recommend it.

Showing posts with label diy. Show all posts
Showing posts with label diy. Show all posts
Father's Day gift guide 2018

With Father's Day only 2 weeks away, I have a few suggestions for you, if you're still looking for gifts. From fragrance and grooming, to a must have Dremel 4300 multi-tool*, there's something for all budgets.

DIY: Turning old packaging into gorgeous decor pieces.

I love DIY! I am not sure if you know this, but my blog actually started as a DIY blog. I used to make jewellery, other accessories and anything else that I came up with. Being creative is a big part of my life. I don't have much time for any projects while looking after two kids and breastfeeding, but... I have been dying to upcycle two cardboard tubes my We Made Me baby carriers came in and I think I did pretty well, don't you think? Emma Bridgewater inspired homeware anyone? I am sooo, soo pleased with these! I used two techniques to cover the boxes in the print. One is super simple, one requires a bit more effort.
Simple Christmas DIY ideas

I love DIY projects and December is my favourite time to be a little bit more creative. Every year I put together little bits and bobs to make my house look more festive and I really enjoy it! In today's post I am sharing 5 simple Christmas DIY ideas and one of them can be used as a gift as well :)
Beauty DIY

If you have been a reader of my blog for a long time, you will know that I love little diy projects and I often make my own bath bombs and body scrubs. I was recently challenged by AO to try making some homemade beauty products, including a whipped body butter, salt scrub and lip balm and I simply couldn't say no. How did I do?
Christmas Decor DIY: Reusing Empty Neom Candle Jars


I really wanted to reuse some of the gorgeous silver pine cones and leaves from the Christmas bouquet I received from Debenhams recently and I came up with this simple idea :)
No more mess- how to store your mineral foundations and pigments
I mentioned in my Inika review that I found a solution to prevent all mineral powders and pigments from making a mess. Here is a quick and simple thing you can do.
It is a 1 minute job and you will only need foam/sponge (about 2cm thick) and scissors.
1.Cut a circle out of foam to match the shape of your container.
2.Place the foam circle on the sieve and screw the lid back on.
That's it! I have been carrying my pigments and powders in my handbag and they are clean and I don't need to worry about them making a mess anymore :)
DIY Neon Earrings with Rhinestones and Dip Dye tassels
I promised to do DIY Mondays, so here is a simple 5 minute DIY makeover.
I transformed 2 pairs of boring earrings into perfect summer pieces.
You will need old earrings with rhinestones, nail polish and some kitchen roll (to protect the surface). Simply paint the earrings with nail polish of your choice (I needed 2 coats) and let it dry. Et voila! :) I am really happy with both pairs I made. They are perfect for summer.
YOU CAN ALSO MIX THE COLOURS TOGETHER FOR A GRADIENT EFFECT:
My latest 5 minute DIY - cute flower headband
I made this cute flower headband today to match my new DIY skirt. It is really simple.
1.You will need a plain headband, ribbon or a long strip of fabric, thread and needle (or glue) and some plastic flowers to attach to the headband.
2.Wrap the ribbon around the headband, securing it with thread or glue.
3.Make a flower out of leftover ribbon (any shape you want) and attach the plastic flowers.
DIY: How to make a galaxy nail polish ring
I love to make jewellery and when I seen nail polish rings on etsy, I decided to make my own. I thought it will be fun to make a Galaxy inspired ring. Here is what you will need:
1.A flat clear gemstone ( I couldn't find a clear one, so I used a pink/peachy colour)
2.A ring base (available on ebay)
3.Nail polish of your choice: I used Essence Blue Addicted and Edward, DL Mermaids Dream
4.Superglue.

1.A flat clear gemstone ( I couldn't find a clear one, so I used a pink/peachy colour)
2.A ring base (available on ebay)
3.Nail polish of your choice: I used Essence Blue Addicted and Edward, DL Mermaids Dream
4.Superglue.
DIY neon earrings and necklace.
Hi everyone!
I was looking for a pair of neon earrings, but I really couldn't find anything, so I decided to make a pair myself :) I found silver Love earrings in my jewellery box and I simply painted them with nail polish.
I also changed the DIY necklace that I made before, by painting some of the rhinestones pink and yellow. If you don't want to spend a fortune to buy new accessories, you can use what you've got and give it a little makeover :)


xxx
DIY: Noir inspired neon and rhinestone necklace
I hope you are having a lovely Saturday. It is really warm and sunny in Glasgow.
I was planning to add a NOTD post today, but I forgot that I had this one ready ;)
I made this necklace last week, when I was making my neon bangles. (click)
It is really easy to make, simply stitch the rhinestone necklace onto a shoe lace! ;)


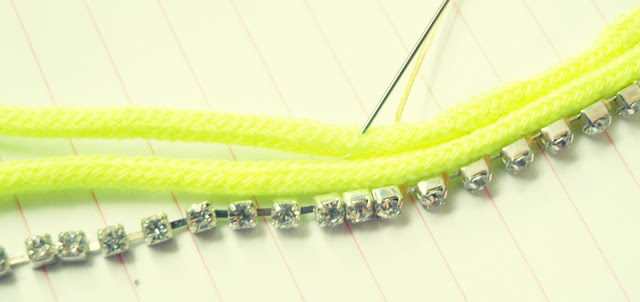
xxx
DIY spiked pink neon necklace NOIR INSPIRED
Hallo my lovelies!
I haven't done a DIY post in ages, but I found time to make this piece today and I couldn't wait to share it with you.
I got my inspiration from the new NOIR neon collection and I am trying to make more Noir inspired pieces.
The first thing I made is this neon pink necklace with crystal embedded spacers and silver spikes. I love it!

YOU WILL NEED:


VOILA!
SIMPLES! :)
I ♥ MAKING BATH BOMBS

I love bath bombs, and I used to be addicted to Lush ones, but... I figured that it will be cheaper and more fun to make them myself. I bought all the ingredients and "equipment" to make them and here is the final effect. I will try to add a tutorial in the future.
The fresh ones I photographed, are scented with vanilla and lemon grass and decorated with rose petals :)


 |
| In a wicker basket, with cute tissue paper and ribbons they make a great gift x |
latest DIY projects
I was planning to do quite a lot of DIY step by step projects on my blog but it is impossible when my baby boy is trying to climb everything in sight :) haha
Instead of showing you step by step pictures, I am sharing the final effects. I made a sequin bib necklace and two friendship bracelets.


DIY: How to make a studded faux leather collar
This is my first DIY post and I need to admit- with a 6 month old baby boy crawling on the floor trying to grab everything in his eyesight - it was very hard!!!
The technical side of the project did not turn out 100% the way I planned it :) I wasn't able to take pictures of everything...But I am happy with the final effect :)

You will need: faux leather, scissors, studs, satin ribbon & hemming tape

1.cut a collar shape out of faux leather ( C shape)

2.attach studs (I used the ones that pierce through the fabric and close on the other side)
very easy to bend, you can use your hands to do it :)

3.follow around the edge

4.Attach satin ribbon with iron on hemming tape (follow instructions on the packaging)
or stitch the ribbon onto the collars ends.
I used hemming tape.
Remember-leather sticks to the iron- so be careful not to touch the leather directly with the iron.
use cotton fabric to protect it.

Et Voila!

I am sorry that I didn't provide detailed pictures of attaching the ribbon and studs, but I am sure its easy enough to figure out how to do it. Use your imagination with the studs, I used 3 different sizes in two colours to give it a unique and interesting look.
Here is the full collar. I love it!

Subscribe to:
Posts (Atom)